

TeleToyland Sandbox How It Works
Overview
The TeleToyland Sandbox system consists of two main components: The camera, and the control system.
The camera is a DLINK DCS-930L Internet Camera, which has it's own built in web-server hosting the images. The DCS-930L also has sound, whcih is not in the DCS-920 cameras, so if you have Java, you can hear the motors.
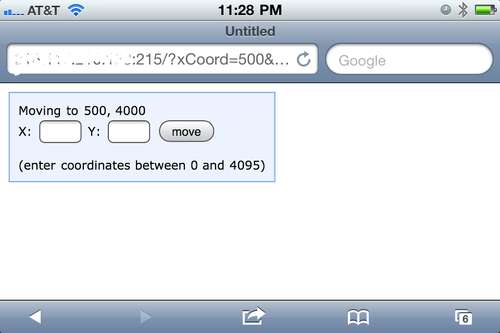
The control system starts on the web server, where we use JavaScript to draw the dots and coolect the points. PHP scripts manage the XY Table bay making a telnet connection to an Arduino micro controller with and Ethernet Sheild. The Arduino buffers up the commands, and drives two Pololu JRK controllers to move the X and Y Axis motors and a hobby servo to move the quill up and down.
LED Lighting
Getting the lighting just right for these projects is a challenge, especially for the sandboxes since there should be enough light to show the ridges without washing the scene out. Also, the camera often gets too much light and even after adjusting the brightness, making it hard to get even lighting across the sandbox. So, for this project we used LED strip lighting to see how that would work. The idea was to put the lights right next to the sand to highlight the ridges. There are many colors available, so we decided to try six of them (Red, Yellow, Green, Blue, Soft White, and White) to see which is best. We could have used an RGB strip, but wanted to try the separate colors first to see how they looked, and it was less expensive. Since we have an Arduino, and can easily add N-Channel FETs to control them, we decided to go ahead an add them right to the project so you can choose your favorite colors. We can even control the brightness to a degree by using the Arduino PWM output.
The LED light strips are available from a few places - among them are: This approach works fairly well, but we still had issues with getting even brigtness across the screen. We found that using some tinted plexiglass in front of the LEDs helps a lot. The colors look great in person, but the camera seems to lose some of the colors, and the automatic exposure control tends to make them look similar, and even change the colors that are being observed. The camera we used does not have controls over the white balance or tint, but it's possible that a different camera would have different results.
Instructable
This Instructable covers the table construction, and here is the text of the Instructable:
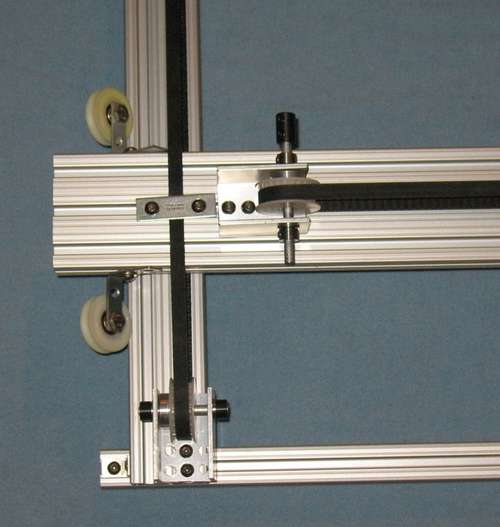
This is a ridiculously easy (in terms of power tool use - see below) way to make a lower precision XY Table. With the wide availability of T-Slot extrusions on Amazon and Ebay, and using simple home improvement store hardware, this is a great way to build these kinds of projects. Using patio door rollers on an angle is a low cost and easy way to handle what are often complex mechanics on CNC machines.
How easy is "ridiculously easy"? Here is a list of all the fabrication required:
1) For each of the six timing belt pulley brackets, cut 2.25" of channel aluminum, drill two 1/2" holes (pro-tip: use a step drill), and two 13/64" holes.
2) Cut 7" off the ends of two 1"x2" t-slot extrusions.
That it! The rest is like assembling an Erector set. Nuts and bolts. T-Slot is so cool! :-)
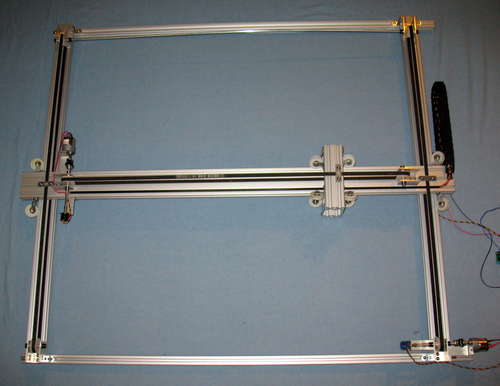
Following a previous Instructable , this is another approach to making a lower cost, lower precision XY table for the TeleToyland Sandbox project. You can try it out live at the site .
The previous approach is working well, but having the ability to easily adjust each of the parts is a great advantage of the T-Slot. Tightening the timing belts with screws in wood can be challenging to get just right, but with T-Slot it's very easy. While the cost is a bit higher by using bearings vs. drawer slides, we don't have the drawer slides sticking out like we do now, getting tripped over and caught in bicycle spokes. :-)
In addition to the T-Slot, we tried to keep the parts easily available (i.e. from home improvement stores), and as always, requiring the least amount of precision drilling etc. We've built a lot of projects, and anything that requires a hole to be drilled in a particular spot seems to be hard to get just right. We do have the tools - punches, drill presses etc., but it's just cooler to be able to use a hacksaw and hand drill! :-)
Here's a video of it in operation during testing:
Intro | 1 | 2 | 3 | 4 | 5 | 6 | 7 | 8 | 9
The TeleToyland Sandbox system consists of two main components: The camera, and the control system.
The camera is a DLINK DCS-930L Internet Camera, which has it's own built in web-server hosting the images. The DCS-930L also has sound, whcih is not in the DCS-920 cameras, so if you have Java, you can hear the motors.
The control system starts on the web server, where we use JavaScript to draw the dots and coolect the points. PHP scripts manage the XY Table bay making a telnet connection to an Arduino micro controller with and Ethernet Sheild. The Arduino buffers up the commands, and drives two Pololu JRK controllers to move the X and Y Axis motors and a hobby servo to move the quill up and down.
LED Lighting
Getting the lighting just right for these projects is a challenge, especially for the sandboxes since there should be enough light to show the ridges without washing the scene out. Also, the camera often gets too much light and even after adjusting the brightness, making it hard to get even lighting across the sandbox. So, for this project we used LED strip lighting to see how that would work. The idea was to put the lights right next to the sand to highlight the ridges. There are many colors available, so we decided to try six of them (Red, Yellow, Green, Blue, Soft White, and White) to see which is best. We could have used an RGB strip, but wanted to try the separate colors first to see how they looked, and it was less expensive. Since we have an Arduino, and can easily add N-Channel FETs to control them, we decided to go ahead an add them right to the project so you can choose your favorite colors. We can even control the brightness to a degree by using the Arduino PWM output.
The LED light strips are available from a few places - among them are: This approach works fairly well, but we still had issues with getting even brigtness across the screen. We found that using some tinted plexiglass in front of the LEDs helps a lot. The colors look great in person, but the camera seems to lose some of the colors, and the automatic exposure control tends to make them look similar, and even change the colors that are being observed. The camera we used does not have controls over the white balance or tint, but it's possible that a different camera would have different results.
Instructable
This Instructable covers the table construction, and here is the text of the Instructable:
This is a ridiculously easy (in terms of power tool use - see below) way to make a lower precision XY Table. With the wide availability of T-Slot extrusions on Amazon and Ebay, and using simple home improvement store hardware, this is a great way to build these kinds of projects. Using patio door rollers on an angle is a low cost and easy way to handle what are often complex mechanics on CNC machines.
How easy is "ridiculously easy"? Here is a list of all the fabrication required:
1) For each of the six timing belt pulley brackets, cut 2.25" of channel aluminum, drill two 1/2" holes (pro-tip: use a step drill), and two 13/64" holes.
2) Cut 7" off the ends of two 1"x2" t-slot extrusions.
That it! The rest is like assembling an Erector set. Nuts and bolts. T-Slot is so cool! :-)
Following a previous Instructable , this is another approach to making a lower cost, lower precision XY table for the TeleToyland Sandbox project. You can try it out live at the site .
The previous approach is working well, but having the ability to easily adjust each of the parts is a great advantage of the T-Slot. Tightening the timing belts with screws in wood can be challenging to get just right, but with T-Slot it's very easy. While the cost is a bit higher by using bearings vs. drawer slides, we don't have the drawer slides sticking out like we do now, getting tripped over and caught in bicycle spokes. :-)
In addition to the T-Slot, we tried to keep the parts easily available (i.e. from home improvement stores), and as always, requiring the least amount of precision drilling etc. We've built a lot of projects, and anything that requires a hole to be drilled in a particular spot seems to be hard to get just right. We do have the tools - punches, drill presses etc., but it's just cooler to be able to use a hacksaw and hand drill! :-)
Here's a video of it in operation during testing:
Intro | 1 | 2 | 3 | 4 | 5 | 6 | 7 | 8 | 9